
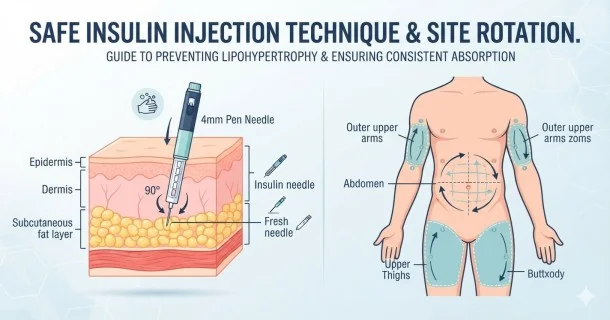
Master your insulin therapy with safe subcutaneous injection steps, site rotation charts, and expert tips to prevent bruising and lipohypertrophy lumps.
Mastering Your Insulin Therapy: Injection Techniques, Sites, and Safety Guide
Starting insulin therapy is a powerful milestone in managing your blood glucose effectively, ensuring your body converts glucose into vital energy. However, achieving optimal blood sugar control depends heavily on using the correct insulin injection technique and understanding how your medication interacts with your body.
Using the proper tools and tracking your routine protects your skin and ensures your insulin absorbs at a stable, predictable pace. Below is an evidence-based roadmap designed to help you avoid common pitfalls like skin lumps, erratic blood sugars, and unnecessary bruising.
Step-by-Step Subcutaneous Insulin Injection Technique
Insulin must always be injected into the subcutaneous layer (the fatty tissue just beneath your skin). Accidentally injecting directly into muscle tissue causes the insulin to absorb too quickly, spiking your risk for unpredictable hypoglycemia (low blood sugar).
  [ Skin Layer ]       --->  Clean with alcohol & let dry fully
  [ Fatty Tissue ]     --->  Target zone (Subcutaneous layer)
  [ Muscle Layer ]     --->  AVOID (Causes dangerously fast absorption)
- Prepare Your Supplies: Wash your hands thoroughly. Check your insulin label to confirm the correct type and expiration date. If using intermediate (cloudy) insulin, roll the vial gently between your palms—never shake it, as shaking introduces dosing bubbles.
- Select Your Site: Choose a healthy fatty zone at least 2 inches away from your belly button, scars, or moles.
- Insert the Needle: Hold your insulin pen or syringe perpendicular (90-degree angle) to your skin. If you are leaner or using a longer needle, your healthcare provider may advise pinching a skin fold and injecting at a 45-degree angle.
- Deliver and Dwell: Push the plunger fully down. Leave the needle embedded for 5 to 10 seconds before pulling it out. This prevents the medication from leaking backward out of the track.
- Apply Light Pressure Only: If you notice a drop of blood or minor leaking, apply light pressure with a clean gauze pad.
CRITICAL MEDICAL WARNING: Never massage or rub the injection site after administering insulin. Massaging alters local blood flow and disrupts the natural release of the medication, triggering dangerous blood glucose fluctuations.
Selecting and Rotating Your Insulin Injection Sites
Different areas of your body absorb insulin at varying rates. The abdomen absorbs insulin the fastest and most consistently, followed by the outer upper arms, thighs, and buttocks.
| Injection Zone | Absorption Speed | Best Practice |
|---|---|---|
| Abdomen | Fast & Highly Consistent | Stay 2 inches away from the navel. |
| Upper Arms | Moderate | Use the fatty outer back section. |
| Thighs | Slow | Target the front and outer side areas. |
| Buttocks | Slowest | Focus on the upper, outer gluteal region. |
Avoiding Lipohypertrophy (Insulin Lumps)
Injecting repeatedly into the exact same spot causes lipohypertrophy—a rubbery, thickened buildup of fat cells caused by the natural growth properties of insulin. Because these lumpy areas have reduced pain sensation, many individuals mistakenly favor them. However, lumpy tissue blocks proper insulin uptake, causing unexplained spikes in blood sugar or sudden crashes.
- Follow a Rotation Chart: Divide your chosen injection zone into smaller quadrants. Shift your daily injection spot systematically, keeping each new puncture at least one finger-width (1 centimetre) apart from your last one.
- Rest Lumpy Tissue: Regularly feel your skin for firm or swollen knobs. If you detect a lump, stop injecting into that specific site completely and let the area heal for several months.
- Use Fresh Needles: Always use a brand-new needle for every injection. Reusing needles dulls the tip, causing microscopic tissue trauma that accelerates skin scarring and lumps.
How to Stop Bruising During Insulin Therapy
Minor bruising occurs naturally when a needle nicks a tiny, superficial blood vessel beneath the skin. While not structurally dangerous, you can dramatically lower the frequency of bruises with these habits:
- Optimize Needle Length: Ask your doctor about switching to short, modern needle sizes, such as a 4 mm pen needle or a 6 mm syringe needle. Shorter needles are highly effective and safely minimize tissue trauma across all body types.
- Inject Room-Temperature Insulin: Cold insulin straight from the refrigerator can cause a painful sting and localized irritation. Keep your currently active insulin vial or pen at stable room temperature, and save the refrigerator strictly for your unopened backup supply.
- Hold Firm Pressure: Immediately after withdrawing your needle, press down firmly on the spot with a clean finger or cotton swab for 10 to 15 seconds. Do not rub or scrub the area.
Frequently Asked Questions (FAQ)
Which body site is best for my fast-acting mealtime insulin?
The abdomen is the preferred choice for rapid-acting or short-acting mealtime insulins because it offers the fastest and most reliable absorption rate, helping process carbohydrates efficiently.
What should I do if I accidentally inject into a lumpy area?
Monitor your blood glucose levels far more closely over the next several hours. Because lumpy, lipohypertrophic tissue alters absorption, your blood sugar may stay unexpectedly high or drop suddenly later on. Note the location and avoid using it until the tissue softens.
Can I inject my insulin directly through my clothing if I am in a hurry?
No, you should never inject insulin through clothes. Doing so prevents proper skin sterilization, keeps you from inspecting the injection site, risks bending the needle, and can result in inaccurate dosing or infection.