
Master proper subcutaneous insulin injection techniques. Learn site rotation patterns, syringe air-clearing rules, and how to avoid painful injections.
Step-by-Step Insulin Administration Guide: Injection Techniques and Safety Tips
Proper insulin administration requires adhering to a precise clinical protocol to optimize subcutaneous absorption, minimize tissue damage, and ensure accurate glycemic management. Whether you are newly diagnosed or refining your daily routine, applying correct injection methods drastically reduces localized discomfort and prevents unexpected blood sugar fluctuations.
Make sure to double-check the physical label of your insulin vial or pen to confirm you are preparing the exact type and dose prescribed by your healthcare provider before beginning.
Pre-Administration Preparation Protocols
Before performing an injection, establish a clean environment and inspect your supplies thoroughly to eliminate contamination risks:
- Perform Hand Hygiene: Wash your hands thoroughly with warm water and soap to prevent introducing bacteria to the injection site.
- Normalize Medication Temperature: Always ensure the in-use insulin is at room temperature. Injecting cold medication directly out of the refrigerator can trigger distinct local pain and localized stinging. Active vials remain stable at room temperature under 86°F (32°C) for up to a month.
- Inspect the Liquid: Rapid-acting and short-acting insulins must look completely clear and transparent. Intermediate-acting options naturally appear uniformly cloudy. Discard any insulin displaying unexpected clumping, frosting, or discoloration.
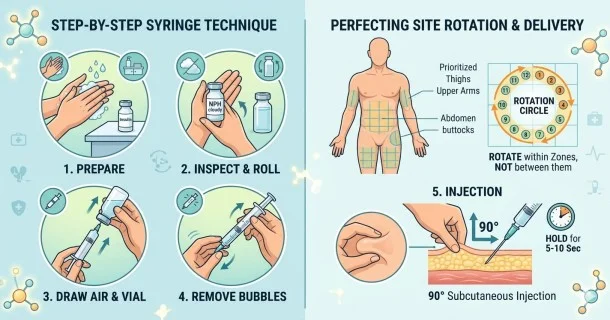
- Resuspend Cloudy Formulations: If utilizing a cloudy intermediate-acting suspension, gently roll the vial or pen between your palms to mix it. Never shake the vial vigorously, as this introduces micro-bubbles that disrupt accurate dose measurements.
Step-by-Step Syringe Extraction Technique
If you utilize standard U-100 syringes and vials, follow this sequence to measure a precise dose without air bubbles:
- Sanitize the Site: Clean your chosen injection site with an alcohol swab and allow the skin to air-dry completely to prevent stinging upon insertion.
- Equalize Vial Pressure: Draw an volume of air into the syringe equal to your prescribed insulin unit dose. Keeping the vial upright on a flat surface, insert the needle through the rubber stopper and inject the air into the bottle. This prevents a negative vacuum from forming inside the glass.
- Invert and Draw: Turn the vial and syringe upside down. Pull the plunger back slowly to draw a dose slightly higher than your required units.
- Clear Air Pockets: Tap the side of the syringe barrel firmly with your finger to force any trapped air bubbles to rise to the top. Depress the plunger gently to push the air and excess medication back into the vial, stopping precisely at your exact unit line.
- Verify the Verification: Remove the needle from the vial and double-confirm that the plunger alignment displays the correct numerical dose.
Perfecting the Subcutaneous Injection Technique
Insulin must be deposited into the fatty subcutaneous tissue layer just beneath the skin, avoiding the underlying muscle.
1. Master Site Selection and Rotation
The primary clinical injection sites include:
- The Abdomen: The most common site due to its surface area and fast, highly predictable absorption rates. Avoid a 2-inch radius around the navel.
- The Thighs: Front and outer aspects; exhibits slower absorption rates.
- The Posterior Upper Arms: Best suited for individuals with sufficient subcutaneous tissue.
Crucial Safety Rule: Always rotate your injection sites systematically within your chosen anatomical zone. Avoid injecting into areas with visible scars, stretch marks, moles, or lesions. Frequent injections into the exact same localized spot cause lipohypertrophy (an abnormal buildup of subcutaneous fat tissue) which delays and disrupts insulin absorption.
2. Delivery Step
- Hold the syringe or pen firmly like a pencil. Gently pinch a 1-to-2-inch fold of skin if instructed by your educator to protect the muscle layer.
- Insert the needle quickly at a 90-degree angle (or a 45-degree angle if utilizing long needles or if thin tissue layers are present).
- Depress the plunger slowly and steadily using your thumb until the dose is fully delivered.
- Leave the needle embedded under the skin for 5 to 10 seconds before withdrawing it to ensure no medication leaks out.
- Medical Correction Note: Do not massage the injection site firmly after withdrawal. Massaging accelerates absorption unpredictably, risking a sudden drop in blood sugar. If a tiny droplet of blood or insulin appears, simply press down lightly with a clean cotton ball or gauze pad for a few seconds.
Frequently Asked Questions (FAQ)
Why is it so critical to rotate my daily insulin injection sites?
Rotating your injection sites keeps the skin and subcutaneous fat healthy. If you repeatedly inject insulin into the exact same small area, the fat cells will swell and harden, causing a localized condition called lipohypertrophy. Lipohypertrophy makes the area less sensitive to pain, but it drastically delays insulin absorption. This can cause erratic blood sugar readings, unexplained high numbers after meals, or late, unexpected drops in blood sugar.
What should I do if a small drop of insulin leaks out after I pull the needle out?
Seeing a tiny droplet on your skin occasionally is common and usually does not require a dose adjustment. To prevent this leakage, ensure you leave the needle embedded completely under the skin for at least 5 to 10 seconds after the plunger is fully depressed before gently drawing it out. Apply light, steady pressure with a clean tissue or gauze pad for a few seconds, but do not rub or massage the skin.
Can I reuse my insulin syringe or pen needles to save money?
No, medical guidelines state that syringes and pen needles are strictly single-use devices. Reusing a needle dulls its tip, strips away its specialized lubricating coating, and causes structural bending at a microscopic level. This increases injection pain, elevates the risk of micro-bleeding, and promotes lipohypertrophy. Furthermore, an opened needle allows bacteria to enter the sterile vial, risking systemic infections.
Why does my insulin injection burn or sting occasionally?
Stinging or minor burning during an injection is usually caused by two common errors: injecting insulin that is still cold from the refrigerator, or failing to let alcohol air-dry completely on your skin before inserting the needle. To fix this, always let your active bottle sit at room temperature, and wait roughly 30 seconds for the skin to dry completely after wiping it with an alcohol pad.